 The other day, I came home from work and I stepped out the front door to check the mail. I was really surprised to see a big package from Anthropologie on my door mat. I don't really talk about Anthropologie that much- I'm pretty sure Jeremy doesn't even know it exists. I couldn't really figure out who would be sending me something from that store. Then, I got really nervous that it was just delivered to the wrong house!
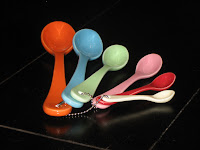
But no, it was for me! My BFF, Am, sent me the best measuring spoons ever! I've wanted them for such a loooong time, but couldn't really justify the purchase. As you can see, I have several sets of measuring spoons . . .
 Amy was with me in Anthropologie one time (when I was buying them for someone else as a gift) and I could not stop talking about how much I loved them!
I have several sets and I should really think about donating a few to a better cause, but I probably won't. These cheap, plastic mustard yellow measuring spoons should be the first to go, but I'll never get rid of them!
After college and before I was married, I didn't have so many sets of fancy measuring spoons. I was telling my mom and my Nana about how I was baking a dessert and somehow, I lost my teaspoon. I don't know what happened to it. I don't know if it was baked into the dessert or if I accidentally threw it away. It just disappeared. That meant anytime something called for 1 teaspoon- I had to use the 1/2 teaspoon twice. Funny story!
But my Nana couldn't believe it! She gave me an extra set of hers- the cheap, plastic mustard yellow measuring spoons. Who even knows how old these things are?!?! So, I'm holding on to them and holding on to the memory!

On to seeing these little spoons in action . . .

I was making cupcakes for a work friend's birthday. I always like to try new things, so I settled on a vanilla cupcake with chocolate chip buttercream frosting.
For the cupcake part, I used the "white cake" recipe in the Better Homes and Gardens cookbook. I feel like almost everyone I know has this cookbook, so I'm not going to post the recipe. If you want the recipe and don't have the book, email me and I will copy it for you.
I'm a big fan of this cupcake recipe! They turned out really well! Better than a mix!


I used a buttercream recipe from Martha Stewart.

I made the letters by melting vanilla flavored candy wafers. You can find those at most craft stores (Michaels or Hobby Lobby). They come in lots of different colors!
Put about 1/4 cup or so of the wafers (depends on how much writing you plan to do) in a ziploc sandwich size plastic bag. Microwave for 30 seconds or until wafers have melted. Snip off a tiny corner of the baggie and you're ready for letters.
I printed out a page of a font I like, so I could trace the letters and they would all be the same size and style. It didn't really work so well for this. I ended up just doing my own thing. Put a piece of wax paper on a cookie sheet and pipe out all your letters. I highly encourage you to write it out several times. You never know when one might break and if you don't have extra, you'll have to start all over again with melting the wafers.
When you have all your letters on the cookie sheet, pop it into the fridge for 20-30 minutes, so they can get really hard.
Ingredients:
12 ounces (3 sticks), unsalted butter, softened
1 lb confectioners' sugar, sifted
1/2 teaspoon of pure vanilla extract
Beat butter with a mixer on medium high speed until pale and creamy, about 2 minutes.
Reduce speed to medium. Add sugar, 1/2 cup at a time, beating after each addition, about 5 minutes. Add vanilla, and beat until buttercream is smooth. Use immediately or cover and refrigerate for up to 3 days.
To make it chocolate chip buttercream- add 2 cups semi-sweet chocolate chips. I used regular chips, but I think mini-chips would have worked better.
The finished product spells out "happy birthday sami!"

I made the letters by melting vanilla flavored candy wafers. You can find those at most craft stores (Michaels or Hobby Lobby). They come in lots of different colors!
Put about 1/4 cup or so of the wafers (depends on how much writing you plan to do) in a ziploc sandwich size plastic bag. Microwave for 30 seconds or until wafers have melted. Snip off a tiny corner of the baggie and you're ready for letters.
I printed out a page of a font I like, so I could trace the letters and they would all be the same size and style. It didn't really work so well for this. I ended up just doing my own thing. Put a piece of wax paper on a cookie sheet and pipe out all your letters. I highly encourage you to write it out several times. You never know when one might break and if you don't have extra, you'll have to start all over again with melting the wafers.
When you have all your letters on the cookie sheet, pop it into the fridge for 20-30 minutes, so they can get really hard.


3 comments:
cute spoons! I have had trouble even finding one set in the whole of Guayaquil.. But finally the search paid off!
Too bad I didn't know- I could have sent you one of my extras!!!
Glad you like the spoons- and glad to be the source of a wonderful post about lots more than just the new spoons! love ya!
Post a Comment